Wednesday, July 28, 2010

History’s Greatest Star Map


Next time you’re out under a clear, dark sky at night, look up and pick out a star at random. Chances are, nobody knew until 15 years ago how far away that star is. Now, thanks to the European Space Agency’s Hipparcos mission, we know.

Your randomly chosen star is probably somewhere between 100 and 1000 light-years away, although there’s about a 15% chance that it’s closer, and about a 10% chance that it’s farther. If your star is one of that nearest 15%, then its distance was probably known, to an accuracy of 50% or better, before Hipparcos. Otherwise, astronomers could have given you no better than a rough estimate of your star’s distance.

Direct measurements of star distances come from the method of triangulation, or parallax: Look at the star from two different directions, and measure its angular shift as you switch viewing locations. It’s the same principle as two-eyed vision, except that in the case of stars, the two viewing locations are on opposite sides of earth’s orbit around the sun—300 million kilometers apart.

Despite this enormous baseline, the angular shifts are miniscule, even for the nearest stars. And for stars beyond 100 light-years, the angles are too small to measure with any accuracy through earth’s blurry atmosphere. So in 1989 the ESA launched the Hipparcos satellite, carrying a special-purpose telescope dedicated to making accurate measurements of the positions of 100,000 stars. By repeating the measurements over a three-year period, the instrument determined not only the parallax shifts but also the steady motions of the stars as they gradually drift across our galaxy. The catalog of results, published in 1997, gives accurate distances and motions for all but a handful of the naked-eye stars, and many, many more.

You can now read about the Hipparcos mission in a new book by Michael Perryman: The Making of History’s Greatest Star Map. Perryman was Coordinating Scientist for the Hipparcos mission, and he does a masterful job at conveying what an immense undertaking it was. Hundreds of scientists spent many years of their careers on Hipparcos, while some of Europe’s most advanced industries fabricated the satellite and its unique optical system. The story also includes high drama, thanks to the failure of the booster rocket that was to put the satellite into its final orbit. That the scientists were able to recover from this disaster and still surpass all the mission’s goals was nothing short of miraculous.

Unfortunately, Perryman’s book has several shortcomings. He tries to do too much, telling not only the story of the Hipparcos mission but also the whole history of astronomy since ancient times—in fewer than 300 pages. Indeed, the main intent of this book is apparently to establish the place of Hipparcos in history, and to properly credit several dozen of the principal scientists for their respective roles. Educating the reader is secondary, and although the book tries to be accessible to non-astronomers (and to wow them with vague superlatives), I fear that most would be overwhelmed by the enormous number of technical details so superficially explained. I learned quite a bit from the book, but I’m already a professional physicist who teaches introductory astronomy. For my own part, I was disappointed that the book didn’t adequately explain how the Hipparcos optical system worked, or even point to a reference where I could learn more. I still have no idea why the system’s limiting resolution was about a thousandth of an arc-second, or how this relates to the diameter of its main mirror (30 centimeters).

Still, the inadequacies of the book shouldn’t detract from the importance of the Hipparcos mission. Virtually every subfield of astronomy now rests upon a firmer foundation, thanks to Hipparcos.

As an American, I can’t help but notice the differences between Hipparcos and the many equally impressive science missions carried out by NASA. Hipparcos produced no pretty pictures, and made no sudden discoveries. You can’t convey its importance in a ten-second sound-bite. It was designed, built, launched, operated, and funded by people who were focused not on short-term payoffs but on the long-term advancement of science. Such a mission would never have been supported by NASA, an agency that is forced to put glamor ahead of science because its budget is continually threatened by the whims of politicians. Of course, an advantage of the American system is that NASA has become very good at making its results accessible to the general public.

Ironically, it may not be long before the importance of the Hipparcos mission is merely historical. Encouraged by its success and the progress of technology over the last two decades, the ESA is now preparing a successor mission called Gaia, scheduled for launch in late 2012. If all goes as planned, Gaia will measure the positions of a billion stars, with an accuracy a hundred times greater than that of Hipparcos. Its completed three-dimensional star map will stretch across most of the Milky Way galaxy, far beyond the most distant naked-eye stars. Gaia will also discover thousands of planets orbiting distant stars, as well as tens of thousands of asteroids within our solar system. It will gather data over a period of five years, and its results will be published by 2020.

Saturday, July 24, 2010

How to Photograph the Milky Way


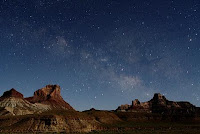
This summer I’ve been making quite a few wide-angle astronomical photos, especially of the Milky Way. Here are links to a collection of photos taken in June in the San Rafael Swell, and some other miscellaneous astronomical photos.

When I show these photos to people, they often ask how to make similar photos themselves. Here’s a summary of what I’ve figured out so far. For much more advice on astrophotography, I highly recommend Jerry Lodriguss’s site.

To photograph the Milky Way, you need the following:
  • A camera. I use Canon’s cheapest digital SLR, the Rebel XS (street price $500). Any other DSLR will probably work fine, except perhaps some of the earliest models which have higher noise levels. There may now be some high-end point-and-shoot cameras that will give acceptable results, but I’m not sure of this; most point-and-shoot cameras can’t take long enough exposures, and even if they could, the noise levels would be unacceptable. Film cameras don’t work well because even the fastest readily available films aren’t as sensitive to dim light as the sensor in a DSLR.
  • A wide-angle lens. I’ve invested in a Sigma 20mm f1.8 lens ($520), although the inexpensive 18-55mm zoom lens that came with my camera was good enough to get started. If money is no object, get the Canon 24mm f1.4 ($1700), along with a full-frame Canon 5D ($2500); that’s what the pros seem to use, as far as I can tell.
  • A tripod. I got a perfectly usable one at a discount store for $29.
  • A dark site. This is the most difficult part for many people. You cannot make decent photos of the Milky Way from a light-polluted city. But here in Utah, there are some very dark sites within a one-hour drive of my urban home. Depending on where you live, you may need to travel farther.
Of course, you also need a clear sky with a view of the Milky Way. From the northern hemisphere, the best views of the Milky Way are in the summer, with the brightest parts in the southern sky.

Before heading out on a dark night, practice with the settings on your camera. Put it in fully manual mode, including manual focus. Set it for a 30-second exposure at ISO 1600, with the lens at its widest aperture (perhaps f3.5 on a zoom lens). Practice turning the display on and off, and turn its brightness down. Set the camera to store images in “raw” format, rather than jpeg. Most importantly, figure out how to manually focus the lens at infinity. Some lenses are conveniently labeled for focusing, but my zoom lens isn’t, so I had to mark the infinity setting (when zoomed out to 18mm) with white tape.

With this preparation, taking the photos should be pretty easy. Turn the display off when you’re pointing the camera (so it doesn’t ruin your eyes’ dark adaptation), then turn it back on to check the settings (30 seconds, ISO 1600, widest aperture) and fire away. It’s hard to compose a photo in the dark, but you can review the composition on the LCD and try again as needed.

After downloading the photos to your computer, use the software that came with the camera to adjust the brightness, contrast, and color balance. With “raw” images you can make some pretty dramatic adjustments without losing quality.

Speaking of quality, there are three factors that limit the amount of detail in a photo of this type:
  1. Digital noise, which gets worse at higher ISO settings;
  2. Lens aberrations, which blur and dim the edges of the image, and which get worse when the lens is opened to a wide aperture (low focal ratio);
  3. The earth’s spinning motion, which turns star images into trails and blurs the Milky Way over time. (In 30 seconds the earth turns by 1/8 of a degree.)
To lessen any one of these problems, you generally need to worsen one of the others. The trick is to make sure that no one of them is much worse than the other two. By all means, experiment with different ISO settings, apertures, and exposure times. I always stop-down my Sigma lens to about f2.8 to reduce aberrations, but stopping-down may not be an option if you’re using a relatively slow zoom lens. I’m happy with ISO 1600, which is the highest setting on my camera. Most of the digital noise disappears when I reduce the photos to screen size, but in long exposures there are always some “hot pixels” which can be manually fixed in Photoshop if necessary.

Even with the most expensive equipment, photos made in this way will not be sharp enough to withstand poster-size enlargements. For example, I’m a big fan of Wally Pacholka’s photos, and I have a framed 36-inch panorama of his in my living room, but it doesn’t show much more detail at that size than in the screen version on his web site.

It’s a nice touch to include foreground scenery in your photos, but if you want more than silhouettes, you’ll need to plan carefully. A small amount of artificial light, from ambient light pollution or even a flashlight, can sometimes illuminate the scenery without ruining the Milky Way. Moonlight is another option, but anything bigger than a crescent moon will brighten the sky too much for a good Milky Way photo, and there are only a few nights each month, and a few hours each of these nights, when the crescent moon is above the horizon after dark. Even then, the moonlight won’t always be shining in the direction you want.


If you don’t want to include foreground scenery in your photos, then life becomes much easier. You can try using a tracking mount to compensate for the earth’s rotation, allowing much longer exposure times. Then you can use a smaller aperture and/or lower ISO setting to reduce problems 1 and 2 above. You can even use a film camera, which is far less expensive but requires additional skills and patience.