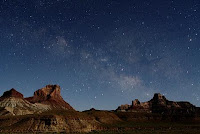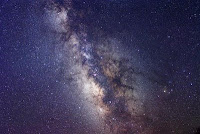
When I show these photos to people, they often ask how to make similar photos themselves. Here’s a summary of what I’ve figured out so far. For much more advice on astrophotography, I highly recommend
Jerry Lodriguss’s site.
To photograph the Milky Way, you need the following:
- A camera. I use Canon’s cheapest digital SLR, the Rebel XS (street price $500). Any other DSLR will probably work fine, except perhaps some of the earliest models which have higher noise levels. There may now be some high-end point-and-shoot cameras that will give acceptable results, but I’m not sure of this; most point-and-shoot cameras can’t take long enough exposures, and even if they could, the noise levels would be unacceptable. Film cameras don’t work well because even the fastest readily available films aren’t as sensitive to dim light as the sensor in a DSLR.
- A wide-angle lens. I’ve invested in a Sigma 20mm f1.8 lens ($520), although the inexpensive 18-55mm zoom lens that came with my camera was good enough to get started. If money is no object, get the Canon 24mm f1.4 ($1700), along with a full-frame Canon 5D ($2500); that’s what the pros seem to use, as far as I can tell.
- A tripod. I got a perfectly usable one at a discount store for $29.
- A dark site. This is the most difficult part for many people. You cannot make decent photos of the Milky Way from a light-polluted city. But here in Utah, there are some very dark sites within a one-hour drive of my urban home. Depending on where you live, you may need to travel farther.
Of course, you also need a clear sky with a view of the Milky Way. From the northern hemisphere, the best views of the Milky Way are in the summer, with the brightest parts in the southern sky.
Before heading out on a dark night, practice with the settings on your camera. Put it in fully manual mode, including manual focus. Set it for a 30-second exposure at ISO 1600, with the lens at its widest aperture (perhaps f3.5 on a zoom lens). Practice turning the display on and off, and turn its brightness down. Set the camera to store images in “raw” format, rather than jpeg. Most importantly, figure out how to manually focus the lens at infinity. Some lenses are conveniently labeled for focusing, but my zoom lens isn’t, so I had to mark the infinity setting (when zoomed out to 18mm) with white tape.
With this preparation, taking the photos should be pretty easy. Turn the display off when you’re pointing the camera (so it doesn’t ruin your eyes’ dark adaptation), then turn it back on to check the settings (30 seconds, ISO 1600, widest aperture) and fire away. It’s hard to compose a photo in the dark, but you can review the composition on the LCD and try again as needed.
After downloading the photos to your computer, use the software that came with the camera to adjust the brightness, contrast, and color balance. With “raw” images you can make some pretty dramatic adjustments without losing quality.
Speaking of quality, there are three factors that limit the amount of detail in a photo of this type:
- Digital noise, which gets worse at higher ISO settings;
- Lens aberrations, which blur and dim the edges of the image, and which get worse when the lens is opened to a wide aperture (low focal ratio);
- The earth’s spinning motion, which turns star images into trails and blurs the Milky Way over time. (In 30 seconds the earth turns by 1/8 of a degree.)
To lessen any one of these problems, you generally need to worsen one of the others. The trick is to make sure that no one of them is much worse than the other two. By all means, experiment with different ISO settings, apertures, and exposure times. I always stop-down my Sigma lens to about f2.8 to reduce aberrations, but stopping-down may not be an option if you’re using a relatively slow zoom lens. I’m happy with ISO 1600, which is the highest setting on my camera. Most of the digital noise disappears when I reduce the photos to screen size, but in long exposures there are always some “hot pixels” which can be manually fixed in Photoshop if necessary.
Even with the most expensive equipment, photos made in this way will not be sharp enough to withstand poster-size enlargements. For example, I’m a big fan of
Wally Pacholka’s photos, and I have a framed 36-inch panorama of his in my living room, but it doesn’t show much more detail at that size than in the
screen version on his web site.
It’s a nice touch to include foreground scenery in your photos, but if you want more than silhouettes, you’ll need to plan carefully. A small amount of artificial light, from ambient light pollution or even a flashlight, can sometimes illuminate the scenery without ruining the Milky Way. Moonlight is another option, but anything bigger than a crescent moon will brighten the sky too much for a good Milky Way photo, and there are only a few nights each month, and a few hours each of these nights, when the crescent moon is above the horizon after dark. Even then, the moonlight won’t always be shining in the direction you want.

If you don’t want to include foreground scenery in your photos, then life becomes much easier. You can try using a
tracking mount to compensate for the earth’s rotation, allowing
much longer exposure times. Then you can use a smaller aperture and/or lower ISO setting to reduce problems 1 and 2 above. You can even use a film camera, which is far less expensive but requires additional skills and patience.


